简介
基本用Hexo + Next把网站搭建起来用run了,而且Next在theme中github关注量最高,但是在样式上还是有些。。。。。。此博文用来记录对Next主题的一些样式上的更改,持续更新中~。
版本信息
| id | name | version | remark |
|---|---|---|---|
| 1 | Hexo | v3.8.0 | 系统版本 |
| 2 | NextT.Pisces | v7.0.1 | 主题版本 |
| 3 | Theme | Gemini | 主题样式 |
正菜
社会程序猿,人好话不多!!!sidebar圆角
打开blog/themes/next/source/css/_variables/Gemini.styl,搜索border-radius,在_variables目录下有Next主题的4种theme,用哪个修改哪个,修改代码:
1
2
$border-radius-inner = 16px
$border-radius = 16px我的修改完了,现在下面站点简介的sidebar,上面的圆角居然有背景色,继续进行优化修改。
打开文件blog\themes\next\source\css_custom\custom.styl(只能说这个文件太NB了,里面可以放置整个站点的style css,very NB),新增代码:1
2
3
4// sidebar css
.sidebar{
background-color:transparent;
}把sidebar背景色设置成透明。
站点背景图
Next主题加上背景图,让博客变得更美观,很简单。
找到一张背景图,把图片放到以下文件中并命名background.jpg:
位置:blog/public/images/打开blog/themes/next/source/css/_custom/custom.styl此文件,加入以下代码在文件最上面:
1
2
3
4
// 背景图
body {
background:url(/images/background.jpg);
}刷新,样式可以根据自己的需要对图片进行进行调整。
文章阴影边框
位置:blog\themes\next\source\css_custom\custom.styl
打开上述文件,添加如下代码:1
2
3
4
5
6
7
8// 主页文章添加阴影效果
.post {
margin-top: 0px;
margin-bottom: 60px;
padding: 25px;
-webkit-box-shadow: 0 0 5px rgba(250, 128, 114, 1.5);
-moz-box-shadow: 0 0 5px rgba(202, 203, 204, .5);
}- webkit-box-shadow:控制边框的样式
- webkit-box-shadow:控制边框的样式
阅读全文特效
位置:blog/themes/next/source/css/_variables/Pisces.styl
打开上述文件,搜索Button,更改代码如下:1
2
3
4
5
6$btn-default-radius = 15px
$btn-default-bg = black
$btn-default-color = white
$btn-default-border-color = blue
$btn-default-hover-color = red
$btn-default-hover-bg = yellow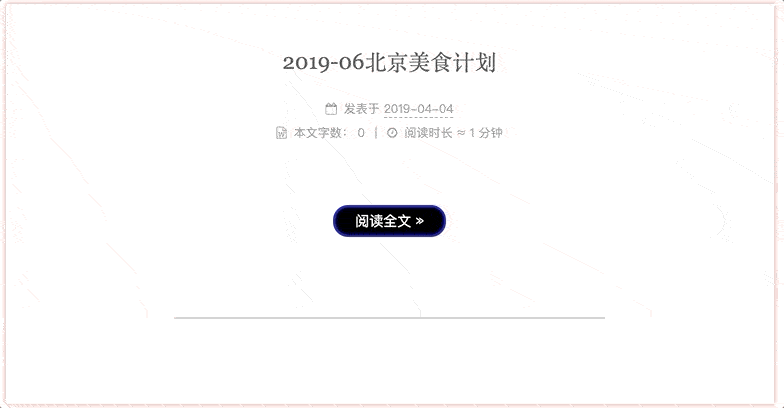
文章底部#号标签
位置:blog/themes/next/layout/_macro/post.swig
打开配置文件,搜索“tag”,将# 更改代码如下:1
<i class="fa fa-tag"></i>即可。
同理,icon也可以根据自己选取。标签暂时还是有下划线的,如果想要想去掉下滑线并添加自己的样式,添加代码到如下文件:
位置:blog\themes\next\source\css_custom\custom.styl1
2
3
4.posts-expand .post-tags a {
border-bottom: none;
font-size: 18px;
}post透明
位置:blog/themes/next/layout/_macro/post.swig
新增代码:1
2
3
4.content {
margin-top: 22px;
opacity: 0.9;
}我只调整了post部分,没有调整sidebar的透明度,如果需要设置,添加代码如下:
1
2
3
4.sidebar{
background-color:transparent;
opacity: 0.9;
}post-block圆角
设置主页每个文章块的圆角,还是样式自定义文件,添加代码:
1
2
3
.post-block {
border-radius : 12px;
}
back-to-top样式更改
修改回到顶部的按钮样式。
配置
位置:blog\themes\next\source\css_custom\custom.styl
打开上述文件,开启back-to-top功能,修改如下代码:1
2
3
4
5
6back2top:
enable: true
# Back to top in sidebar.
sidebar: false
# Scroll percent label in b2t button.
scrollpercent: true样式修改
位置:blog\themes\next\source\css_custom\custom.styl
打开上述文件,添加如下代码:1
2
3
4
5
6
7
8
9
10
11
12
13
14
15
16
17
18
19.back-to-top {
right: 60px;
width: 70px; //图片素材宽度
height: 350px; //图片素材高度
opacity: 1;
bottom: unset;
transition: all .5s ease-in-out;
background: url("/images/scroll.png");
//隐藏箭头图标
> i {
display: none;
}
&.back-to-top-on {
bottom: unset;
top: 0px;
}
}
代码块样式
位置:blog\themes\next_config.yml
打开上述文件,搜索highlight_theme,更改代码如下:1
2
3# Available values: normal | night | night eighties | night blue | night bright
# https://github.com/chriskempson/tomorrow-theme
highlight_theme: night bright主题有很多,根据自己的喜好定义。
标题样式修改
位置:blog\themes\next\source\css_custom\custom.styl
打开上述文件,添加如下代码:1
2
3
4
5
6
7// 标题
.post-title {
color: black;
letter-spacing: 12px;
font-family: Comic Sans MS;
text-shadow: -1px -1px 1px #fff, 1px 1px 1px #000;
}样式根据自己的喜好做相关调整。
小技巧
- 在Hexo配置、博文Title都可以加入font、div等等这样的标签。
- 在修改样式的时候,浏览器调试模式,找到对应的class,全项目搜索,找到对应的文件,直接进行修改,但不建议这么做。
- 可以把样式修改在自定义样式文件:blog\themes\next\source\css_custom\custom.styl(只能说这个文件太NB了,里面可以放置整个站点的style css,very NB)。